Intro
Cameras are getting better all the time at producing perfect representations of reality. But all too often, the images strong on technical excellence are lacking in emotional impact. Some say all images should tell a story. I don’t necessarily need my images to tell a story, but I do want them to invoke an emotional response.
When I am out taking pictures, all of my senses are involved. Not only can I see the scene thru the viewfinder, but I can hear, smell, and touch my environment. Being there is making me feel a certain way. My goal is to create those same feelings in the image, so that when I look at that image later I can revive that moment.
Approaching this from a different perspective, I become motivated to create images of what is in my mind’s eye. I see something that inspires me, toss it around in my mind, and decide how I can make it happen. So, instead of going out with my camera to see what I can find, and trying to get a perfect mirror reflection of it, I am starting with an inspired concept and turning it into a photograph, a photograph inspired by emotions.

Expressiveness
My initial inspiration for this collection came from reading a book on Polaroid transfer prints. I have never made a Polaroid transfer print, but I was fascinated by the process and the resulting creative possibilities. The process as I understand it, involves separating the photographic emulsion from the paper, then transferring the emulsion to a different substrate or surface. The image then takes on the textural characteristics of its new surface.
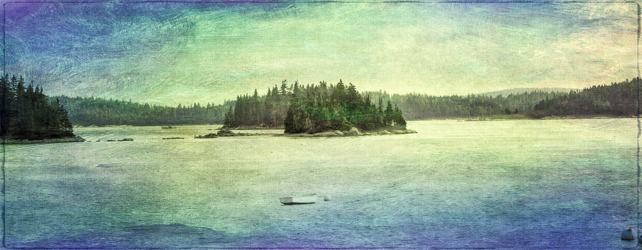
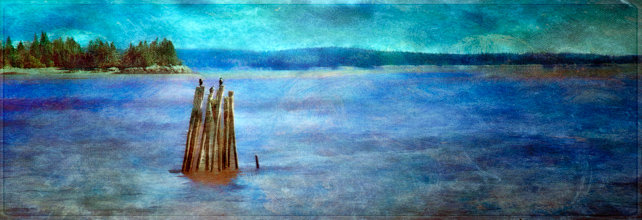
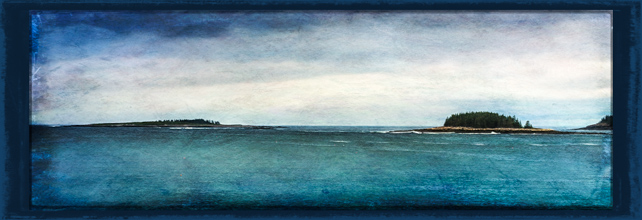
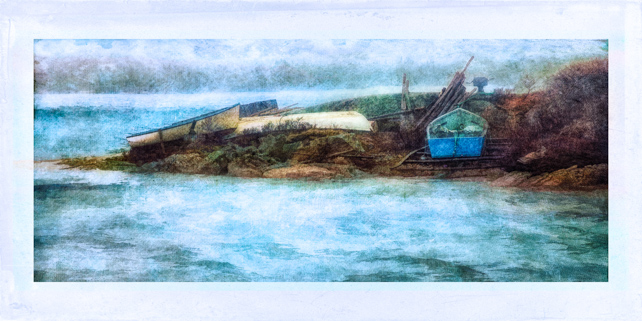
An artist painting a picture creates the mood by his choice of colors and brush strokes. I mimicked that look by adding textures to these seascape images. The textures can be pictures of anything; old plaster walls, concrete, clouds, paper, there are endless possibilities.

Adding Textures
There are several paths to adding textures to images. An easy way to get started is to use photo software that has textures built in. OnOne Perfect Effects and Nik Analog Efex both offer some texturizing capabilities.
OnOne Perfect Effects comes with an extensive set of textures and edge frames. Perfect Effects can be used as a plugin for your favorite software (check the OnOne site for compatible host programs) or a freestanding photo-editing program.
Nik Analog Efex is part of the excellent Google Nik Software Suite. Nik Analog Efex does not have the range of looks of OnOne, but instead concentrates on stylized, vintage looks of old cameras and films.
If you use Photoshop CS6 or CC you can use a free extension from Adobe, Adobe Paper Texture Pro. It uses textures from Flypaper Textures. You can also use your own textures with it. This Photoshop extension automates the process, and makes it just plain fun to add textures to your images. This extension includes a video tutorial from Russell Brown, the Senior Creative Director at Adobe Systems. The video is both informative and entertaining.
My preferred method is to add the textures on layers above the image layer in Photoshop. With each texture on a separate layer, I can reduce the effect by reducing the layer opacity and choose how it blends with the image by selecting the blending mode of the texture layer. Also, with a texture on a layer I can blur, sharpen, or change its color. And, I can reduce the intensity of the texture on local areas of the image by using a layer mask. This would allow me to keep the texture strong on the edges of the images but allow me to minimize it on my main subject.

The Process
For my seascape collection, I chose images with large areas of white, the areas where the textures will show most prominently. Actually most of these images were shot knowing textures would be added to them in post processing. I looked for simple subjects with large areas of negative space. The overcast skies here in New England are perfect for this.
In Photoshop, I used multiple layers, their layer masks and layer blending modes. Two or more textures were used on each image. I find by using multiple textures, the overall texture becomes more complex yet subtle. Often I reduce the opacity of the individual texture layers as well as trying various layer-blending modes on each texture layer. The blending modes I use most are Multiply, Overlay, and Softlight. My favorite blending mode is Multiply. Using the Multiply blending mode will darken the image overall, the image may need to be lightened afterwards.

Conclusion
All of this may seem confusing, my intention is to spike your curiosity to try the process yourself. This is not meant to be a tutorial, the truth is there is no single technique that will always work. The process of adding textures to images has become very popular. A search on the web for textures and Photoshop will yield many tutorials, and free textures for download.
I started by being inspired by Polaroid transfer prints, I ended up with almost a painterly look to my images. I have found it a good exercise and a fun diversion from normal image processing.
Successfully integrating textures to an image seems to be more art than science. Some images work with textures others don’t. The trick seems to be finding the right texture or textures for the image. There is no right or wrong, If you like the result, life is good.
Enjoy,
Michael Rice
Personal website www.twistedtreephoto.com
Hunts Photo and Video Providence, RI